Ultherapy Facial Treatment Guidelines
Ultherapy facial treatment guidelines have been established in clinical trial procedures. Desktop display images show the details of these guidelines, as they appear on the system screen.
Two pre-programmed treatment guidelines:
- Note: please operate according to the flow chart.
- Note: after treatment, from the same or different operating instructions, please make all transmitters recoverthe original setting.
Ultherapy Facial Treatment Guidelines
Ruler For Marking
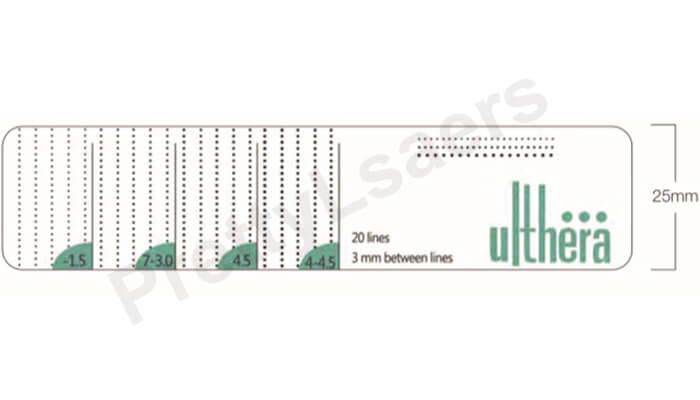
This scale is used to assist in the use of treatment planning markers. The width of the ruler is based on the standard Transducer energy line length (25 mm). Along the sides of the scale can be drawn directly on the width of a row of energy lines, and then moved to the next can be painted next row.
Treatment Marker Line Planning
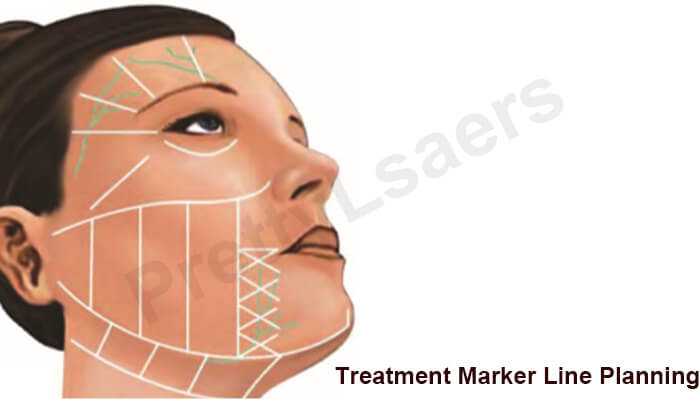
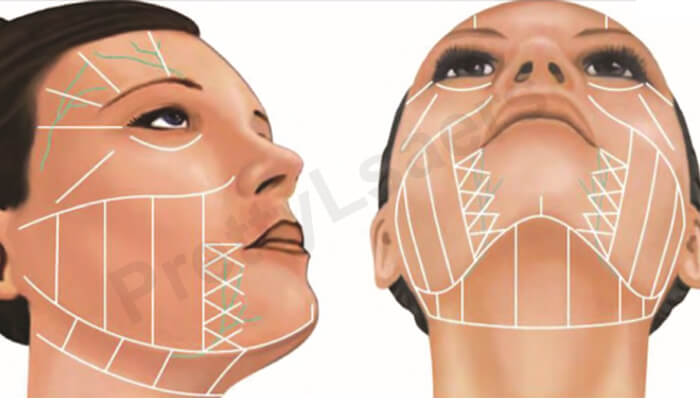
Facial markings are a very important part of the Ultherapy treatment, This step can help the treatment be more effective, during the facial markings. The clinician must identify and mark the important position of the face, including the location of the major bones and nerves, This helps to make the treatment more safe and consistent.
Mark Line Planning: Upper Half Face
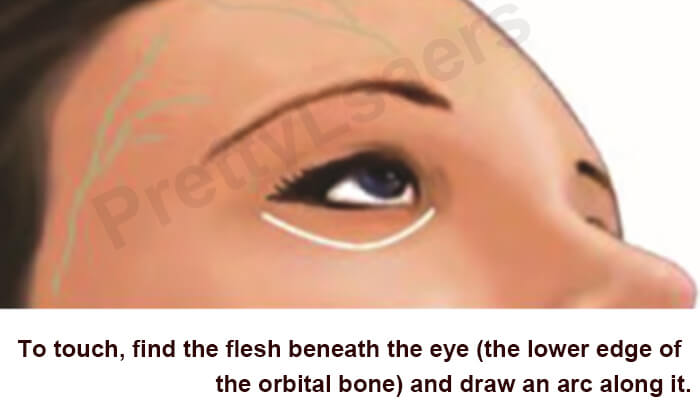
A. Infraorbital margin
To touch, find the flesh beneath the eye (the lower edge of the orbital bone) and draw an arc along it.
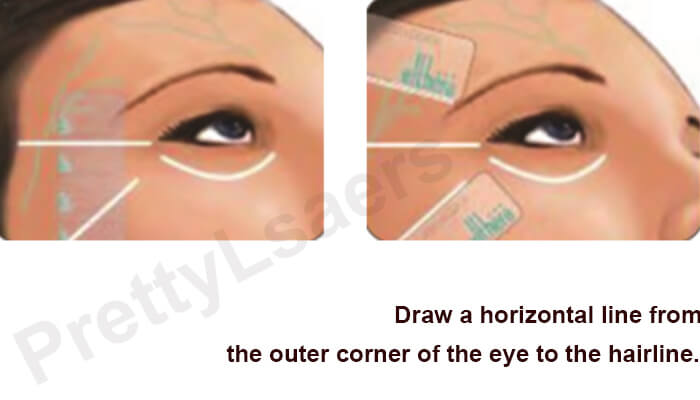
B. Orbital region
- Draw a horizontal line from the outer corner of the eye to the hairline.
- Use the ruler to measure the five lines above and below the treatment of energy lines, and make a mark.
- Draw a horizontal straight line from the above range mark.
- Draw a horizontal straight line from the following range mark.
- The shapes of steps 3 and 4 should show a sector of an eye-like eye.
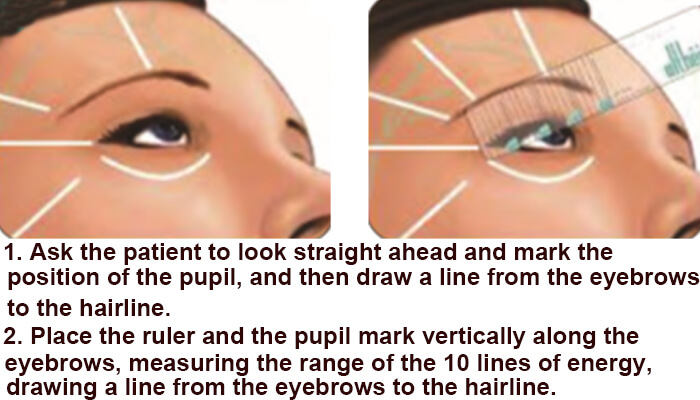
C. Eyebrow area
- Ask the patient to look straight ahead mark the position of the pupil, and then draw a line from the eyebrows to the hairline.
- Place the ruler and the pupil mark vertically along the eyebrows, measuring the range of the 10 lines of energy, drawing a line from the eyebrows to the hairline. The approximate position of the critical nerve of the face.
Marking Line Planning: Upper Head (Mandibular Area)
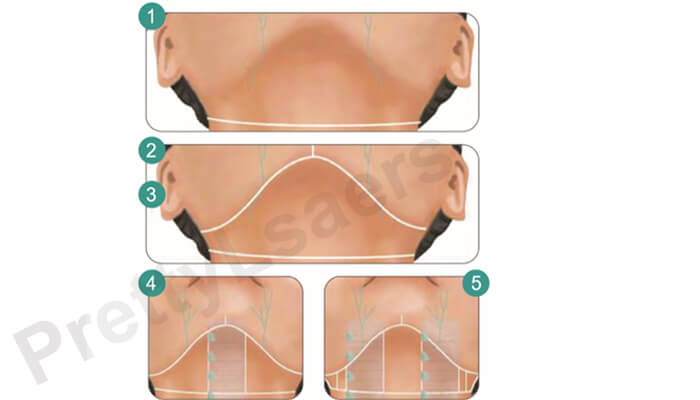
Note: When you draw a new row of treatment areas, each row should overlap the appropriate density of treatment areas on the plan.
D. Head / mandibular region
- Hand to find the thyroid bone area, and then draw a line parallel to the neck from it. 2. Draw a mark in the middle of the chin.
- Draw a line from the middle of the jaw along the curve of the mandible to the sides of the ear.
- Place the center of the planning ruler in the middle of the chin, draw lines along the sides of the plan, and plan a row of treatment areas above the thyroid cartilage area.
- Put on the layout of the plan of the line has just been painted on both sides of the treatment area, with its center, and then continue to draw a total of mandibular area 5-7 row treatment area.
Marker Line Planning: Lower Half Face
E. Cheek
- Find the skull after the highest point, from the beginning to the nose skull faces edge along the outer edge of the skull has been drawn close to ears.
- Plan the ruler vertically on the corner of the mouth, along the other side of the plan (near the edge of the ear) draw a straight line from the cheeks to the chin.
- Place the planning ruler horizontally parallel to the corners of the mouth and draw a line along the plan.
Draw the X on the lower side of the area to identify the location of the mandibular nerve. - Draw out the treatment area of the 2-3 rows outside the X area with the ruler (in the direction from the X area).
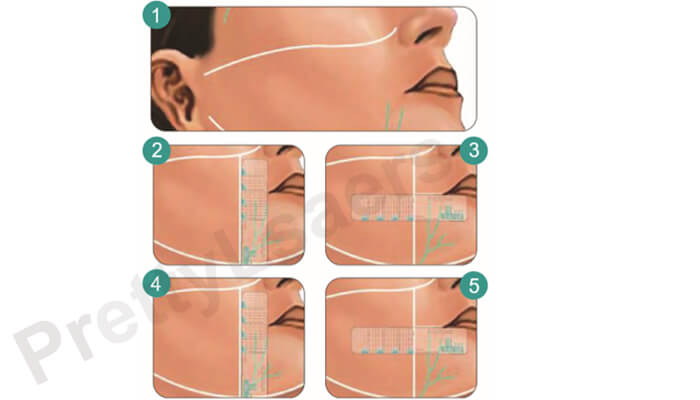
Note: When you draw a new row of treatment areas, each row should overlap the 1-2 points on the plan to draw a more appropriate treatment area.
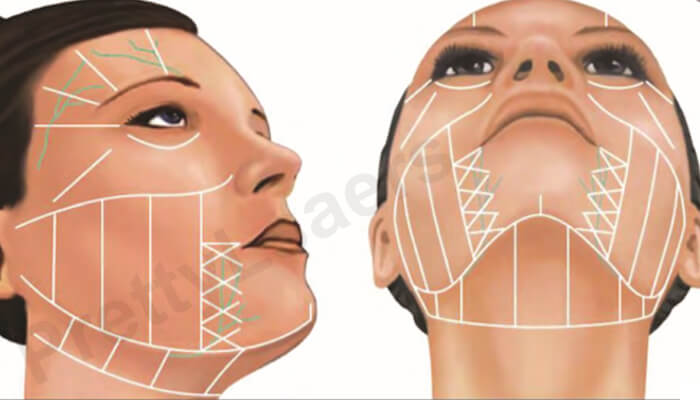
Full Face Mask Line Completion Chart
HIFU Treatment For Face Procedure
There’s no special preparation needed before having an HIFU procedure. You should remove all makeup and skin care products from the target area before hifu facial treatment.
Here’s what to expect HIFU treatment for face steps:
- Select the area to be treated.
- Press the SEE button on the handle to be ready. When the button is on, the system is ready.
- Apply cooling gel on transducer film, to get good contact.
- Ensure proper Contact between the Transducer and the skin.
- Press the TREAT button on the handle at one time, firing an ultrasonic energy line.
- Push the Transducer forward about 2-3cm
- Press the “TREAT” button to shoot other energy lines (ensure the handle is stable and non-removable during energy giveout).
- Repeat steps 3-7 during treatment until the planned shot numbers have been completed.
- Click on the screen to switch to the next treatment area. The previously treated area will become sthe ame color as the transducer, and the chosen area waiting for treatment will become white (which eans ready).
- After all areas have been treated, press the “finish treatment” in the lower right corner of the screen, then press the “ confirm finish”.
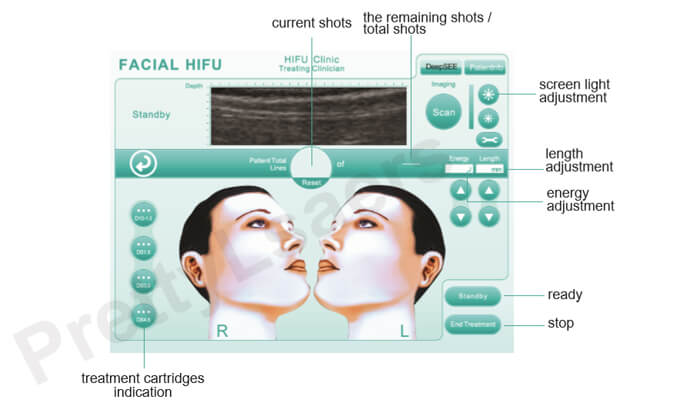
If additional treatments are needed, you will schedule the next treatment.
While the ultrasound energy is being applied, you might feel heat and tingling. You can take a pain medication if it’s bothersome.
You’re free to go home and resume your normal daily activities right away after the procedure.

